
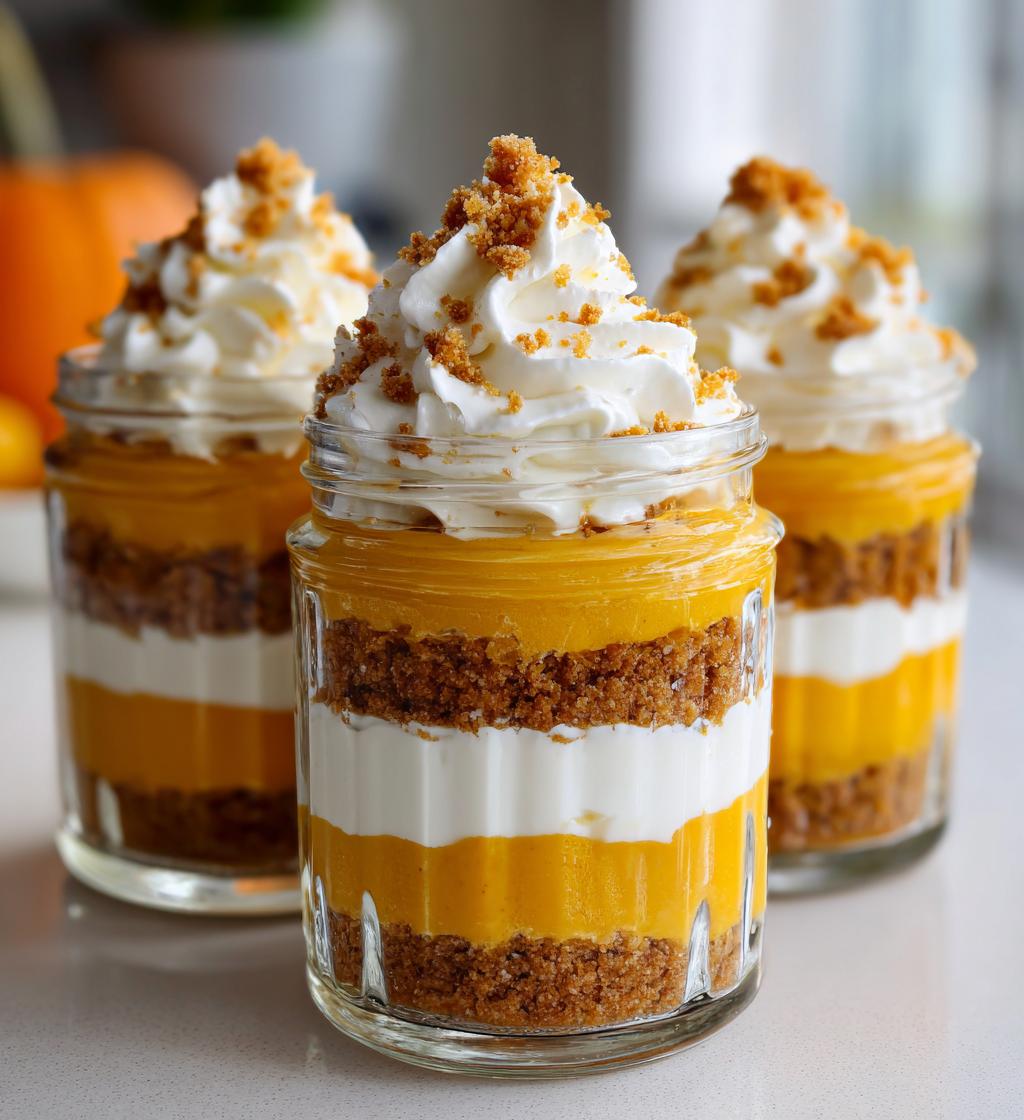
There’s something absolutely delightful about desserts in jars, don’t you think? They’re just so charming and perfect for sharing (or not sharing, no judgment here!). I mean, who wouldn’t want to dig into a creamy, dreamy pumpkin cheesecake jar? It’s like autumn in a bite! What I love most about these pumpkin cheesecake jars is how easy they are to whip up—no baking necessary! Just layer all those luscious flavors in a jar, and you’re good to go. Trust me, once you try this no-bake recipe, you’ll want to make it a fall tradition!
Speaking of traditions, every fall, my family gathers for a big harvest dinner, and I’ve made it my mission to bring the sweetest treats. Last year, I decided to shake things up with these pumpkin cheesecake jars instead of the usual pie. And wow, what a hit they were! Everyone was raving about how light and fluffy the cheesecake was, with that perfect hint of spice. So, grab your jars and let’s get started on this cozy dessert that’s sure to bring a smile to your face!
Ingredients for Pumpkin Cheesecake Jars
Alright, let’s gather all the delicious ingredients you’ll need to make these dreamy pumpkin cheesecake jars. Here’s what you’ll need:
- 8 oz cream cheese (softened): This is the base of your cheesecake, so make sure it’s nice and soft for easy mixing!
- 1 cup pumpkin puree (homemade or canned): Either works perfectly, but if you’re feeling adventurous, homemade adds a personal touch!
- 1/2 cup sugar (adjust to taste): Sweeten it up just the way you like it. Taste as you go!
- 1 tsp vanilla extract: This adds a lovely depth of flavor that complements the pumpkin beautifully.
- 1 tsp pumpkin spice: A must-have for that warm, cozy autumn flavor. Feel free to add a pinch more if you’re a spice lover!
- 1 cup whipped cream (fresh or store-bought): This gives the cheesecake its light and fluffy texture. I love using fresh whipped cream, but store-bought works just as well!
- 1 cup graham cracker crumbs: These will form the crunchy base of your jars—yum!
- 2 tbsp melted butter: This helps bind the graham cracker crumbs together for that perfect crust.
With these simple ingredients, you’re well on your way to creating something absolutely delicious. So, let’s get mixing and layering!
How to Prepare Pumpkin Cheesecake Jars
Now that we’ve got our ingredients ready, let’s dive into the fun part—making these pumpkin cheesecake jars! This is where the magic happens, and I promise it’s super easy. Just follow these simple steps, and you’ll have a delightful dessert in no time!
Step-by-Step Instructions
- Beat the cream cheese: In a large mixing bowl, beat the softened cream cheese with an electric mixer until it’s smooth and creamy. This is key to a luscious texture, so take your time with this step!
- Add the pumpkin goodness: Now, it’s time to add the pumpkin puree, sugar, vanilla extract, and pumpkin spice. Mix everything together until it’s well combined and you can’t see any lumps. Trust me, the aroma will get you in the fall spirit!
- Fold in the whipped cream: Here’s where you want to be gentle. Carefully fold in the whipped cream to the pumpkin mixture. You want to keep that airy, fluffy texture, so use a spatula and go slow. It’s going to be so light and dreamy!
- Prepare the crust: In another bowl, combine the graham cracker crumbs with the melted butter. Mix until all the crumbs are moistened and look like wet sand. This will be the delicious base for your jars!
- Layer it up: Now comes the fun part! Start layering the graham cracker mixture and the pumpkin cheesecake in your jars. I like to do a layer of crumbs, then a layer of cheesecake, and repeat until the jars are filled. You’ll want to leave a little room at the top for whipped cream if you’re feeling fancy!
- Chill out: Once you’ve assembled your jars, pop them in the refrigerator and let them chill for at least 2 hours. This helps all those flavors meld together beautifully. Plus, they’re best served cold!
And there you have it! You’re just a few simple steps away from enjoying these heavenly pumpkin cheesecake jars. I can’t wait for you to dig in—trust me, they’re worth the wait!
Why You’ll Love This Recipe
- Quick prep time (20 minutes): You won’t believe how fast you can whip these up! Perfect for those busy fall days.
- No baking required: That’s right—just mix, layer, and chill! It’s a stress-free way to enjoy dessert.
- Perfect for fall gatherings: These jars are a crowd-pleaser, making them ideal for potlucks, family dinners, or cozy get-togethers.
- Easy to serve and enjoy: Individual servings mean less mess and more enjoyment. Just grab a jar and dig in!
Seriously, once you taste these delightful pumpkin cheesecake jars, you’ll understand why they’re destined to be a staple in your fall dessert lineup!
Tips for Success
Alright, let’s make sure you absolutely nail these pumpkin cheesecake jars! Here are my top tips to guarantee your dessert is a hit:
- Use room temperature cream cheese: This is a game changer! Softened cream cheese mixes in so much easier, giving you that smooth, creamy texture we all love. No one wants lumps in their cheesecake, right?
- Adjust sugar for personal preference: Everyone’s sweet tooth is a little different, so taste as you go! If you like it sweeter, don’t be shy about adding a touch more sugar. You can always start with less and add until it’s just right for you.
- Experiment with different toppings: Get creative! While whipped cream is a classic, you can also try adding chopped nuts for a delightful crunch or a drizzle of chocolate for a touch of decadence. The options are endless!
- Chill longer if possible: If you have the time, letting your jars chill for longer than 2 hours allows those flavors to really meld together. I’ve even left them overnight, and wow, they were even more delicious!
- Use clear jars: If you can, opt for clear jars so everyone can admire those beautiful layers! It adds to the experience and makes them look even more inviting.
With these tips in your back pocket, you’re all set to impress your friends and family with these scrumptious pumpkin cheesecake jars. Enjoy the process and, of course, the delicious results!
Serving Suggestions
Now that you’ve created these delightful pumpkin cheesecake jars, let’s talk about how to serve them up for maximum enjoyment! These jars are not only delicious on their own, but they also pair beautifully with a few simple accompaniments that can take your dessert experience to the next level.
- Freshly brewed coffee: There’s nothing quite like the rich, warm flavor of coffee to complement the creamy sweetness of pumpkin cheesecake. The slight bitterness of the coffee balances out the dessert perfectly.
- Spiced tea: A cozy cup of spiced chai or ginger tea would be a fantastic pairing! The aromatic spices in the tea echo the flavors of your cheesecake and create a comforting, autumnal vibe.
- Light salad: If you want to keep things balanced, consider serving a light salad alongside your jars. A simple mixed greens salad with a tangy vinaigrette can help cut through the richness of the cheesecake and refresh the palate.
- Apple cider: For a truly fall-inspired experience, serve these jars with a glass of warm apple cider. The sweet and spicy notes in the cider enhance the pumpkin flavors in your cheesecake!
- Whipped cream topping: Don’t forget to have extra whipped cream on hand! A dollop on top adds a delicious finishing touch and lets everyone customize their jars just the way they like.
These serving suggestions will elevate your pumpkin cheesecake jars and create a delightful dessert experience for you and your guests. Trust me, once they take a bite, they’ll be asking for seconds!
Storage & Reheating Instructions
Now, let’s talk about how to store your delicious pumpkin cheesecake jars. If you happen to have any leftovers (though I doubt it, because they’re that good!), just pop those jars in the fridge. Make sure to cover them tightly with a lid or plastic wrap to keep them fresh and prevent any funky fridge odors from sneaking in.
These jars are best enjoyed cold, so don’t worry about reheating them—just grab a jar from the fridge and dig in! The creamy texture and all those wonderful flavors are perfect right out of the refrigerator. I mean, who wouldn’t want a chilled treat on a cozy fall day?
If stored properly, your pumpkin cheesecake jars will last for about 3 to 4 days in the fridge. Just keep an eye on them, as the whipped cream might start to lose its fluffiness after a couple of days. But trust me, they won’t last long once you start sharing them!
Nutritional Information
Let’s get to the nitty-gritty of what’s in these scrumptious pumpkin cheesecake jars! Here’s a breakdown of the typical nutritional values per serving (that’s one jar, just in case you were wondering). Keep in mind that these values are estimates and can vary based on the specific brands or ingredients you use:
- Calories: 350
- Total Fat: 22g
- Saturated Fat: 12g
- Unsaturated Fat: 8g
- Trans Fat: 0g
- Cholesterol: 50mg
- Sodium: 150mg
- Total Carbohydrates: 30g
- Dietary Fiber: 1g
- Total Sugars: 20g
- Protein: 4g
This gives you a good idea of what you’re indulging in when you enjoy these delightful jars. Just remember, it’s all about balance, and every creamy spoonful is worth it, especially when shared with loved ones!
FAQ About Pumpkin Cheesecake Jars
Got questions about these scrumptious pumpkin cheesecake jars? Don’t worry, I’ve got you covered! Here are some common queries you might have:
Can I use low-fat cream cheese?
Absolutely! You can use low-fat cream cheese if you prefer, but keep in mind that the texture might be a bit different—less creamy and rich. Still delicious, though!
How long do these jars last in the fridge?
These pumpkin cheesecake jars will last about 3 to 4 days in the fridge. Just make sure to keep them covered tightly, so they stay fresh and delicious!
Can I make these jars ahead of time?
Yes, you can definitely make these pumpkin cheesecake jars ahead of time! In fact, they taste even better after chilling for a while. Just assemble them and pop them in the fridge until you’re ready to serve!
Feel free to reach out if you have any more questions—I’m here to help you make the best pumpkin cheesecake jars ever!
Print
Pumpkin Cheesecake Jars: 5 Irresistible Treats to Savor
- Total Time: 2 hours 20 minutes
- Yield: 4 servings 1x
- Diet: Vegetarian
Description
Delicious pumpkin cheesecake served in jars for easy enjoyment.
Ingredients
- 8 oz cream cheese
- 1 cup pumpkin puree
- 1/2 cup sugar
- 1 tsp vanilla extract
- 1 tsp pumpkin spice
- 1 cup whipped cream
- 1 cup graham cracker crumbs
- 2 tbsp melted butter
Instructions
- In a bowl, beat cream cheese until smooth.
- Add pumpkin puree, sugar, vanilla, and pumpkin spice. Mix well.
- Fold in whipped cream gently.
- In another bowl, combine graham cracker crumbs and melted butter.
- Layer the graham cracker mixture and pumpkin cheesecake in jars.
- Chill in the refrigerator for at least 2 hours before serving.
Notes
- Use homemade or canned pumpkin puree.
- Adjust sugar according to your taste.
- Top with extra whipped cream if desired.
- Prep Time: 20 minutes
- Cook Time: 0 minutes
- Category: Dessert
- Method: No-bake
- Cuisine: American
Nutrition
- Serving Size: 1 jar
- Calories: 350
- Sugar: 20g
- Sodium: 150mg
- Fat: 22g
- Saturated Fat: 12g
- Unsaturated Fat: 8g
- Trans Fat: 0g
- Carbohydrates: 30g
- Fiber: 1g
- Protein: 4g
- Cholesterol: 50mg
Keywords: pumpkin cheesecake jars, no-bake dessert, fall dessert, pumpkin recipes