
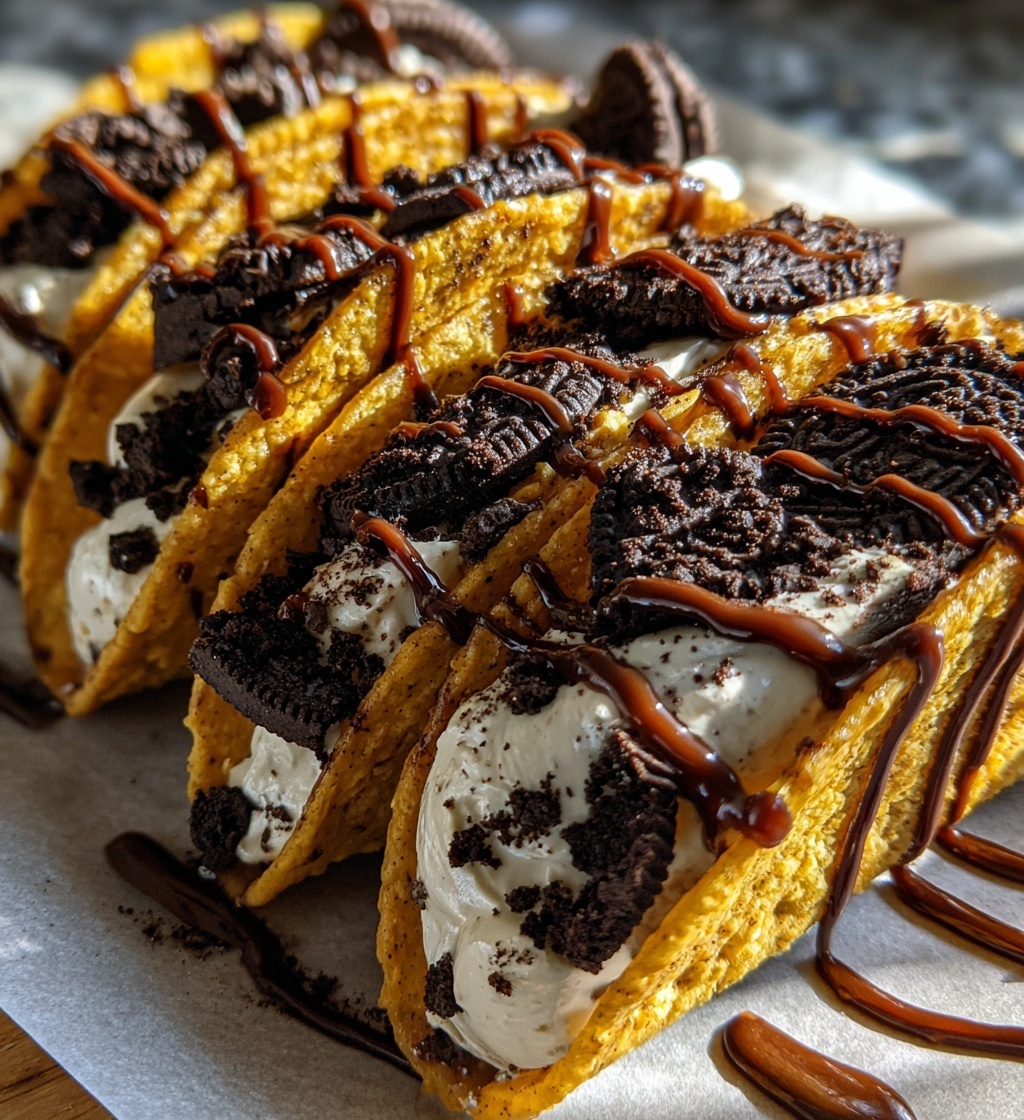
Okay, friends, get ready to have your dessert world rocked because I’m about to introduce you to the most creative and delicious treat ever: Oreo crunch cheesecake tacos! Seriously, who knew that my two favorite indulgences could come together in such a fun way? One afternoon, I was just lounging around with a bag of Oreos and some cream cheese when it hit me—why not make a taco out of cheesecake? The result was a sweet, crunchy, and utterly delightful dessert that’s perfect for any occasion. Trust me, these tacos are not only a feast for the eyes but also a total crowd-pleaser! So grab your ingredients and let’s dive into making these scrumptious Oreo crunch cheesecake tacos that are sure to impress your family and friends!
Ingredients List
- 8 Oreo cookies, crushed into fine crumbs
- 1 cup cream cheese, softened to room temperature
- 1/2 cup powdered sugar
- 1 teaspoon vanilla extract
- 1 cup whipped cream, gently folded in
- 4 taco shells, ready for filling
- Chocolate syrup for drizzling on top
How to Prepare Oreo Crunch Cheesecake Tacos
Making these Oreo crunch cheesecake tacos is as fun as it is simple! Trust me, you’ll want to follow these steps closely to get the perfect blend of creamy, crunchy goodness wrapped in a sweet taco shell. Let’s dive in!
Step-by-Step Instructions
- First, grab those Oreo cookies and crush them into fine crumbs. I usually just pop them in a zip-top bag and give them a good smash with a rolling pin. Set those crumbs aside—they’ll be your crunchy topping later!
- In a mixing bowl, combine the softened cream cheese, powdered sugar, and vanilla extract. Beat them together until the mixture is super smooth and creamy. You want it to be light and airy, so don’t rush this step!
- Next, gently fold in the whipped cream. This is where the magic happens! You want to combine it carefully to keep all that lovely fluffiness. It should look like a dreamy cheesecake filling!
- Now it’s time to fill those taco shells! Spoon the cheesecake mixture into each shell, being generous but careful not to overflow. I like to use a piping bag for a neat finish, but a spoon works just fine too.
- Once they’re filled, sprinkle the crushed Oreos on top of each taco for that delightful crunch. You can really pile it on—more is more here!
- Finally, drizzle some chocolate syrup over the tacos. This step is essential for that extra touch of decadence!
- Chill your tacos in the fridge for about 30 minutes. This helps everything set up nicely and makes them even more refreshing when you serve them!
And there you have it! Your Oreo crunch cheesecake tacos are ready to impress. Just remember to keep them chilled until you’re ready to dig in!
Nutritional Information
Alright, let’s talk about the numbers! While I’m no nutritionist, I want to give you a rough estimate of the nutritional values for each of these delicious Oreo crunch cheesecake tacos. Keep in mind that these values can vary based on specific brands and ingredients you choose to use, but here’s a good ballpark:
- Calories: Approximately 250 per taco
- Fat: About 15g
- Saturated Fat: Roughly 8g
- Trans Fat: 0g
- Cholesterol: Around 30mg
- Sodium: About 150mg
- Carbohydrates: Approximately 30g
- Fiber: About 1g
- Sugar: Roughly 15g
- Protein: About 3g
Remember, these tacos are meant to be a fun treat, so enjoy every bite without stressing too much about the numbers! Treat yourself and your loved ones to this delightful dessert—you won’t regret it!
Why You’ll Love This Recipe
- It’s a fun and creative twist on traditional cheesecake—who doesn’t love dessert tacos?
- Quick and easy to make, with no baking required!
- Perfect for parties or casual get-togethers, and they’re always a hit with both kids and adults.
- Customizable with your favorite toppings or cookie variations for endless possibilities.
- Every bite is a delightful mix of creamy cheesecake and crunchy Oreo goodness!
Tips for Success
Let’s make sure your Oreo crunch cheesecake tacos turn out absolutely perfect! Here are some of my favorite tips that I’ve learned along the way:
- Don’t skip the chilling: This step is crucial! Chilling the tacos for 30 minutes helps the cheesecake mixture firm up, making it easier to eat and enhancing the flavors. It’s worth the wait!
- Use softened cream cheese: Make sure your cream cheese is at room temperature before mixing. This helps achieve a smooth, lump-free filling. If it’s too cold, you might end up with a grainy texture!
- Be gentle when folding: When you fold in the whipped cream, take your time! Use a spatula and a gentle hand to keep that light, fluffy texture. Over-mixing can deflate the volume and your tacos won’t be as dreamy.
- Experiment with toppings: While crushed Oreos are a must, don’t be afraid to mix it up! Try adding sprinkles, crushed nuts, or even a sprinkle of sea salt for a sweet-and-salty combo. The more creative, the better!
- Watch your taco shells: If you’re using store-bought taco shells, check the expiration date and make sure they’re fresh. Stale shells won’t provide that satisfying crunch, and nobody wants a soggy taco!
Follow these tips, and you’ll be well on your way to creating the most delectable Oreo crunch cheesecake tacos that’ll have everyone coming back for seconds! Enjoy the process and have fun with it!
Variations
Now, let’s get a little creative! The beauty of these Oreo crunch cheesecake tacos is that you can switch things up to keep it fresh and exciting. Here are some fun variations to consider:
- Cookie Swap: Instead of Oreos, try using other cookies like chocolate chip, peanut butter, or even graham crackers for a different flavor profile. Each cookie brings its own unique twist!
- Fruit Toppings: Add a burst of freshness by topping your tacos with sliced strawberries, bananas, or blueberries. The fruity sweetness pairs beautifully with the rich cheesecake.
- Nutty Crunch: For an extra layer of texture, sprinkle chopped nuts like walnuts or pecans on top. It adds a delightful crunch and a nutty flavor that complements the cheesecake.
- Flavor Infusions: Mix in some melted chocolate or a swirl of caramel into the cheesecake filling for added richness. You can also experiment with flavored extracts like almond or coconut for a fun twist!
- Decadent Drizzles: Instead of just chocolate syrup, try caramel sauce, peanut butter drizzle, or even a berry coulis for a gourmet touch. Your taco will not only taste great, but it’ll look stunning too!
Feel free to mix and match these ideas to create your own signature version of Oreo crunch cheesecake tacos. The possibilities are endless, and I can’t wait to hear what delicious combinations you come up with!
Storage & Reheating Instructions
If you happen to have any leftovers of these scrumptious Oreo crunch cheesecake tacos (which is a big if, let’s be honest!), you’ll want to store them properly to keep that delightful flavor intact. Here’s how to do it:
- Refrigerate: Place any uneaten tacos in an airtight container and store them in the refrigerator. They’ll stay fresh for up to 3 days. Just make sure they’re well covered so they don’t absorb any other fridge odors—nobody wants a taco that tastes like last week’s casserole!
- Freezing: If you want to save some for later, you can freeze the cheesecake filling separately from the taco shells. Just spoon the filling into a freezer-safe container and store it for up to a month. When you’re ready to enjoy, let it thaw in the fridge overnight before refilling fresh taco shells.
- Serving: There’s no need to reheat these tacos, as they’re best served chilled! Just pull them from the fridge and enjoy the cool, creamy goodness right away. If they’ve been in the fridge for a bit, give them a minute at room temperature—they’ll be even more delightful!
By storing your Oreo crunch cheesecake tacos properly, you’ll ensure that every bite remains just as delicious as the first. Enjoy your sweet creations and don’t forget to share with friends (if you can resist the temptation to keep them all to yourself!).
FAQ Section
Can I use different types of cookies instead of Oreos?
Absolutely! While Oreos give that classic flavor, you can use any of your favorite cookies like chocolate chip, peanut butter, or even graham crackers. Each cookie will add its own unique twist to the cheesecake filling!
How do I make these tacos gluten-free?
It’s super easy! Just swap out the regular Oreos for gluten-free Oreos, and make sure to use gluten-free taco shells. This way, everyone can enjoy these delicious cheesecake tacos!
Can I prepare these tacos in advance?
Yes, you can! I recommend preparing the cheesecake filling and filling the taco shells a few hours before serving. Just be sure to keep them chilled in the refrigerator until you’re ready to serve. They taste even better when they’ve had some time to set!
What’s the best way to serve leftovers?
If you have any leftovers (which, let’s face it, is rare!), store them in an airtight container in the fridge. They’ll stay fresh for up to 3 days. Just pull them out and enjoy them straight from the fridge—no need to reheat!
Can these tacos be frozen?
Yes, you can freeze the cheesecake filling separately from the taco shells. Just spoon the filling into a freezer-safe container and store it for up to a month. When you’re ready to enjoy, thaw it overnight in the fridge and refill fresh taco shells!

Oreo Crunch Cheesecake Tacos: 6 Steps to Sweet Bliss
- Total Time: 50 minutes
- Yield: 4 servings 1x
- Diet: Vegetarian
Description
Delicious cheesecake tacos filled with Oreo crunch.
Ingredients
- 8 Oreo cookies, crushed
- 1 cup cream cheese
- 1/2 cup powdered sugar
- 1 teaspoon vanilla extract
- 1 cup whipped cream
- 4 taco shells
- Chocolate syrup for drizzling
Instructions
- Crush Oreo cookies and set aside.
- In a bowl, mix cream cheese, powdered sugar, and vanilla extract until smooth.
- Fold in whipped cream gently.
- Fill each taco shell with the cheesecake mixture.
- Sprinkle crushed Oreos on top.
- Drizzle chocolate syrup over the tacos.
- Chill for 30 minutes before serving.
Notes
- Use gluten-free Oreos for a gluten-free option.
- Serve with fresh berries for added flavor.
- Prep Time: 20 minutes
- Cook Time: 0 minutes
- Category: Dessert
- Method: No-bake
- Cuisine: American
Nutrition
- Serving Size: 1 taco
- Calories: 250
- Sugar: 15g
- Sodium: 150mg
- Fat: 15g
- Saturated Fat: 8g
- Unsaturated Fat: 5g
- Trans Fat: 0g
- Carbohydrates: 30g
- Fiber: 1g
- Protein: 3g
- Cholesterol: 30mg
Keywords: oreo, cheesecake, tacos, dessert