
Oh my goodness, have you ever tried watermelon mochi? It’s like a little bite of summer wrapped in sweet, chewy goodness! This delightful Japanese dessert combines the unique texture of glutinous rice flour with the refreshing taste of watermelon, making it an absolute treat for your taste buds. I always find myself smiling when I take a bite—it’s that perfect blend of simplicity and sweetness that just hits the spot. Plus, it’s so fun to make! Trust me, once you try this easy recipe, you’ll want to whip up a batch for every warm day ahead. Get ready to impress your friends and family with these little gems!
Ingredients List
- 1 cup glutinous rice flour: This is the star ingredient that gives mochi its signature chewy texture. Make sure it’s glutinous rice flour, not regular rice flour!
- 1/2 cup sugar: This little bit of sweetness balances the flavors perfectly and adds that delightful touch we all love in desserts.
- 1 cup water: This helps bind everything together, so our mochi comes out just right—smooth and pliable!
- 1/2 cup watermelon juice: Freshly squeezed watermelon juice is the key to that amazing fruity flavor. You can even blend up some watermelon and strain it for the freshest taste!
- 1/4 cup cornstarch: This is your trusty anti-stick agent! It keeps the mochi from getting too sticky, making it easier to handle.
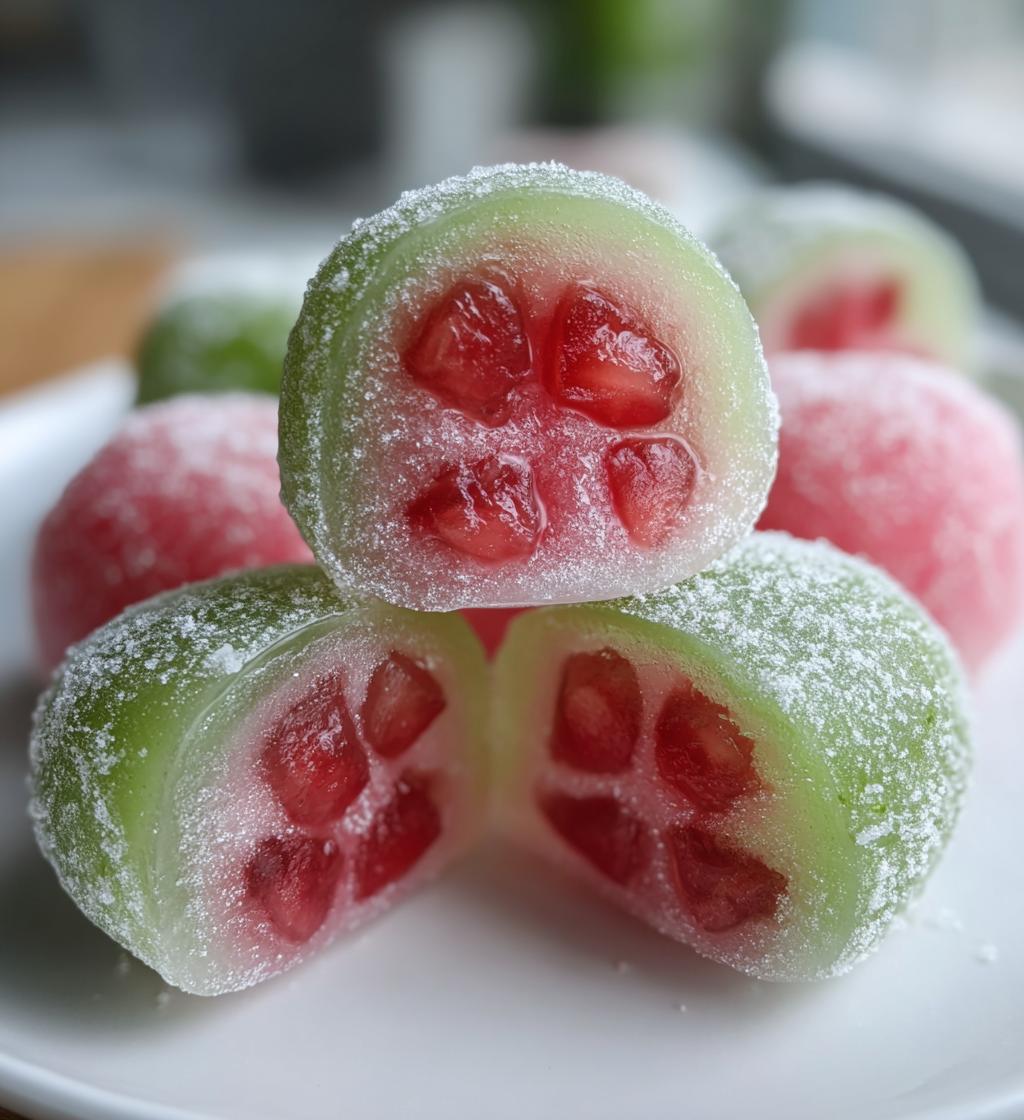
- Watermelon chunks for filling: Use small, juicy pieces of watermelon to fill your mochi. They add a delightful burst of freshness that complements the chewy exterior beautifully!
How to Prepare Watermelon Mochi
Step 1: Mixing the Ingredients
Alright, let’s get started! First up, grab a mixing bowl and combine the glutinous rice flour, sugar, and that beautiful watermelon juice. I love how vibrant and refreshing the juice looks! Stir it all together until you have a smooth mixture—no lumps allowed! If it feels a bit thick, don’t worry; just give it a good mix until it’s all incorporated. You want it to have a nice, silky texture that’s ready to be transformed into mochi magic!
Step 2: Cooking the Mixture
Now, it’s time to cook our mixture! Pour that lovely batter into a microwave-safe dish and cover it with a microwave-safe lid or plastic wrap. This is super important because it helps the mochi steam and gives it that chewy texture we’re after. Microwave it for 2 minutes on high, then take it out and give it a good stir. You might notice it’s starting to get a bit thicker—yay! Pop it back in for another 2 minutes. Keep an eye on it; it should be sticky and slightly translucent when it’s done.
Step 3: Shaping the Mochi
Once your mochi mixture is cooked, let it cool for just a few minutes—it’s going to be hot! Dust your countertop or a clean surface generously with cornstarch to keep things from getting too sticky. Carefully transfer the slightly cooled mixture onto the cornstarch-dusted surface. Now, here comes the fun part! Divide the dough into small pieces—about the size of a golf ball works well.
Flatten each piece with your fingers or a rolling pin. Don’t worry if it’s a little messy; that’s part of the charm! Place a small chunk of watermelon in the center and wrap the dough around it, pinching the edges to seal it tight. Make sure there are no openings; we don’t want any watermelon juice leaking out! Finally, shape it into a ball and give it a little dust with cornstarch to keep it from sticking to anything. And just like that, you’ve got your first piece of watermelon mochi ready to go!
Tips for Success
Making watermelon mochi can be such a joy, but a few little tips can help you nail it every time! First off, don’t skimp on the cornstarch. Dust your hands and the surface generously; this stuff is a lifesaver when it comes to preventing that sticky mess that can happen. Trust me, you’ll thank me later!
Also, keep your watermelon chunks small. Aim for about 1-inch pieces. This makes it so much easier to wrap the dough around them without tearing. If they’re too big, you’ll end up with a mochi that’s tough to seal, and nobody wants that!
Another pro tip? Let the cooked mochi mixture cool down a bit before handling it. It’s so tempting to dive right in, but let it rest for a few minutes so it’s warm but not scalding hot. You’ll have more control when shaping it, and your fingers will be much happier!
Lastly, if you find your mochi dough is a bit too sticky after cooking, sprinkle in a little more cornstarch and knead it gently. Just be careful not to overdo it; we want that chewy texture to shine through! With these tips in your back pocket, you’ll be on your way to making the most delightful watermelon mochi that will impress anyone lucky enough to snag a piece!
Variations of Watermelon Mochi
Oh, the possibilities with watermelon mochi are endless! Once you’ve mastered the basic recipe, you can get super creative with different flavors and fillings. Here are some of my favorite variations to inspire your next batch!
- Strawberry Mochi: Swap out the watermelon juice for fresh strawberry juice. You could even mash up some ripe strawberries and fold them into the dough for an extra fruity twist!
- Mango Delight: Use mango juice instead of watermelon juice for a tropical treat. You can add small chunks of ripe mango inside for added sweetness and texture!
- Matcha Mochi: For a fun twist, mix in a teaspoon of matcha powder into the dough. This will give your mochi a lovely green color and a subtle earthy flavor that pairs wonderfully with sweet fillings.
- Chocolate Surprise: Incorporate cocoa powder into the dough for a chocolatey base, and fill it with sweetened red bean paste or even chocolate ganache. Yum!
- Coconut Cream: Add some coconut milk to your mixture and use shredded coconut as a filling. It’s like a mini vacation in your mouth!
- Fruit Medley: Don’t feel limited to one fruit! Try a mix of small chunks from different fruits like kiwi, blueberries, or peaches for a colorful and flavorful medley.
Experimenting with different flavors is part of the magic of making mochi! Each variation brings its own unique taste and vibe, making every batch a little adventure. So, don’t hesitate to mix and match until you find your perfect combo. Happy mochi-making!
Storage & Reheating Instructions
Once you’ve made that delicious batch of watermelon mochi, you might be wondering how to store any leftovers (if there are any!). To keep your mochi fresh and tasty, I recommend placing them in an airtight container. Make sure to layer them with a sprinkle of cornstarch in between to prevent them from sticking together. Trust me, this little trick will save you from a sticky situation!
Keep your container in the refrigerator, where the mochi can last for about 3 to 5 days. Just remember, the longer they sit, the firmer they may become, so it’s best to enjoy them within a few days for that perfect chewy texture. If you want to keep them for a longer period, you can also freeze them! Just wrap each piece individually in plastic wrap and pop them in a freezer-safe bag. They can be stored this way for up to 2 months.
Now, when it comes to reheating, you’ll want to be gentle to maintain that lovely texture. If you’ve stored them in the fridge, simply take them out and let them sit at room temperature for about 10-15 minutes before enjoying. This will soften them up nicely.
If they’re frozen, you can thaw them in the fridge overnight or pop them in the microwave for about 10-15 seconds on low power. Just keep an eye on them! You don’t want them to get too hot or tough. The goal is to enjoy that delightful chewiness as if they were just made! So, whether you’re savoring them cold or giving them a quick warm-up, you’re in for a treat every time! Enjoy your watermelon mochi, my friends!
Nutritional Information
Now, let’s talk about the nutritional side of our lovely watermelon mochi! Each piece is around 80 calories, which is pretty fantastic for a sweet treat! Here’s a quick breakdown of what you can expect:
- Calories: 80
- Sugar: 10g
- Sodium: 1mg
- Fat: 0g
- Saturated Fat: 0g
- Unsaturated Fat: 0g
- Trans Fat: 0g
- Carbohydrates: 18g
- Fiber: 0g
- Protein: 1g
- Cholesterol: 0mg
Keep in mind that nutritional values can vary based on the specific ingredients and brands you use. So, while I’ve given you a pretty good estimate, it’s not set in stone. I always recommend checking the labels of your ingredients if you’re keeping an eye on your dietary needs. But honestly, these little bites of joy are worth every delicious calorie! Enjoy your watermelon mochi guilt-free!
FAQ Section
Can I make watermelon mochi ahead of time?
Absolutely! Watermelon mochi can be made a day or two in advance. Just make sure to store them in an airtight container in the fridge. They taste even better when they’ve had a little time to chill and let those flavors meld together!
What’s the best way to serve watermelon mochi?
I love serving watermelon mochi chilled, especially on a hot day! You can plate them up as is, or even dust them with a little extra cornstarch for that perfect presentation. They make for a delightful dessert at parties or gatherings—your guests will be so impressed!
Can I use different fruits for the filling?
Definitely! Feel free to get creative with your fillings. Small chunks of strawberries, mango, or even blueberries work wonderfully. You can mix and match different fruits for a fun fruit medley too—just keep those chunks small for easy wrapping!
What if my mochi dough is too sticky?
If your dough feels a bit too sticky after cooking, don’t panic! Just sprinkle a little more cornstarch into the mixture and knead it gently. This should help you achieve that lovely, pliable texture we’re going for. Remember, a little cornstarch goes a long way!
How long does watermelon mochi last?
When properly stored in the fridge, your watermelon mochi can last about 3 to 5 days. If you want to keep them longer, wrap them individually and freeze them for up to 2 months. Just remember to thaw them before enjoying, so they’re nice and soft!
Can I use regular rice flour instead of glutinous rice flour?
I wouldn’t recommend it! Glutinous rice flour is what gives mochi its signature chewy texture, so using regular rice flour won’t yield the same delightful results. Stick to glutinous rice flour for that perfect bite!

Watermelon Mochi: 5 Ways to Delight Your Taste Buds
- Total Time: 20 minutes
- Yield: 12 pieces 1x
- Diet: Vegan
Description
Watermelon mochi is a sweet rice cake filled with watermelon-flavored filling.
Ingredients
- 1 cup glutinous rice flour
- 1/2 cup sugar
- 1 cup water
- 1/2 cup watermelon juice
- 1/4 cup cornstarch
- Watermelon chunks for filling
Instructions
- In a bowl, mix glutinous rice flour, sugar, and watermelon juice.
- Add water gradually and stir until smooth.
- Pour the mixture into a microwave-safe dish.
- Cover and microwave for 2 minutes. Stir and microwave for another 2 minutes.
- Let it cool slightly, then transfer to a cornstarch-dusted surface.
- Divide the dough and flatten each piece.
- Place a watermelon chunk in the center and wrap the dough around it.
- Seal the edges and shape into a ball.
- Dust with cornstarch to prevent sticking.
Notes
- Ensure the watermelon chunks are small for easy wrapping.
- Keep mochi refrigerated to maintain texture.
- Serve chilled for best flavor.
- Prep Time: 15 minutes
- Cook Time: 5 minutes
- Category: Dessert
- Method: Microwave
- Cuisine: Japanese
Nutrition
- Serving Size: 1 piece
- Calories: 80
- Sugar: 10g
- Sodium: 1mg
- Fat: 0g
- Saturated Fat: 0g
- Unsaturated Fat: 0g
- Trans Fat: 0g
- Carbohydrates: 18g
- Fiber: 0g
- Protein: 1g
- Cholesterol: 0mg
Keywords: watermelon mochi, dessert, Japanese sweets