
Oh, Halloween is just around the corner, and let me tell you, there’s nothing more fun than whipping up a batch of *Halloween vampire bite cupcakes*! These spooky little treats are not just delicious, but they’re also a fantastic way to unleash your creativity in the kitchen. Imagine the delight on your friends’ faces when they see those chilling bite marks oozing with red gel “blood”—it’s a guaranteed hit at any Halloween party! Whether you’re hosting a spooky gathering or just want to surprise your family with some festive fun, these cupcakes are the perfect choice. They’re easy to make, and you can really let your imagination run wild with the decorations. Trust me, these cupcakes will be the star of the show, and the best part? They taste as good as they look!
Ingredients for Halloween Vampire Bite Cupcakes
- 1 cup all-purpose flour
- 1 cup granulated sugar
- 1/2 cup unsweetened cocoa powder
- 1/2 cup butter, softened
- 2 large eggs
- 1/2 cup milk
- 1 teaspoon vanilla extract
- 1 teaspoon baking powder
- 1/2 teaspoon salt
- Red gel food coloring (for that spooky blood effect)
- Chocolate frosting (to top off your creations)
How to Prepare Halloween Vampire Bite Cupcakes
Preheat the Oven
First things first, let’s get that oven preheated to 350°F (175°C). Preheating is super important because it helps your cupcakes rise perfectly and gives them that lovely texture we all love. Trust me, you don’t want to skip this step!
Mixing the Batter
Now, grab a big mixing bowl. Start by whisking together the dry ingredients: flour, sugar, cocoa powder, baking powder, and salt. Get them nice and combined! Next, add in the softened butter, eggs, milk, and vanilla extract. Mix it all together until it’s smooth and velvety. I like to use an electric mixer for this part, but a good old-fashioned whisk works too—just get in there and mix until there are no lumps!
Filling the Cupcake Liners
Once your batter is mixed, it’s time to fill those cupcake liners! I usually line a muffin tin with cute liners to make them extra festive. Fill each liner about 2/3 full with batter. This is key—if you overfill them, they’ll overflow and become a messy monster. And we definitely don’t want that!
Baking the Cupcakes
Pop the muffin tin into the preheated oven and bake for 18 to 20 minutes. The smell wafting through your kitchen will be divine! To check if they’re done, stick a toothpick in the center of a cupcake; if it comes out clean, they’re ready to go!
Cooling and Frosting
Once baked, remove them from the oven and let them cool completely in the pan for about 5 minutes, then transfer them to a wire rack. This step is crucial—if you frost them while they’re still warm, the frosting will just melt away! Once they’re cool, generously spread that rich chocolate frosting on top. Yum!
Adding the Finishing Touches
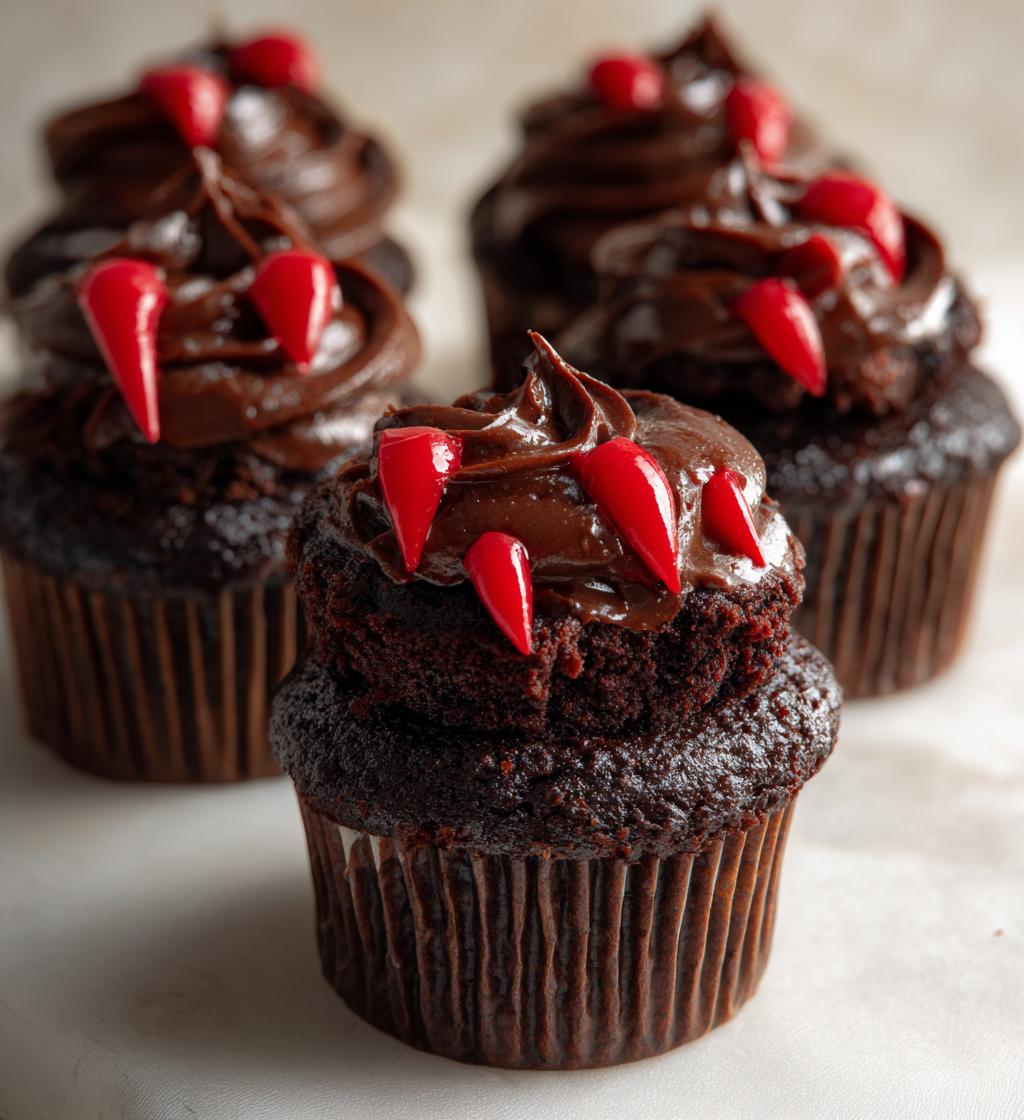
Now for the fun part! Take a sharp knife and gently create bite marks on the top of each cupcake. Then, grab your red gel food coloring and get creative—squeeze a bit here and there to mimic blood oozing out of those bite marks. Feel free to add mini chocolate chips or sprinkles for an extra spooky touch. Let your imagination run wild!
Nutritional Information
Here’s the scoop on the nutrition for these delightful *Halloween vampire bite cupcakes*! Keep in mind that these values are estimates based on standard ingredients, so they might vary a bit depending on how you make them. But hey, we’re here for the fun, right?
- Calories: 210
- Sugar: 18g
- Fat: 9g
- Saturated Fat: 5g
- Unsaturated Fat: 3g
- Trans Fat: 0g
- Carbohydrates: 29g
- Fiber: 1g
- Protein: 2g
- Cholesterol: 30mg
- Sodium: 150mg
So there you have it! These cupcakes are a sweet treat that you can enjoy without too much guilt. They’re perfect for sharing, and I promise, no one will be counting calories when they see these spooky delights on the table!
Tips for Success
Alright, my fellow bakers, let’s make sure your *Halloween vampire bite cupcakes* turn out spooktacular! Here are some handy tips to keep in mind:
- Room Temperature Ingredients: Make sure your butter and eggs are at room temperature before mixing. This helps create a smoother batter and a fluffier cupcake. Trust me, it makes a difference!
- Don’t Overmix: Once you add the wet ingredients to the dry, mix just until combined. Overmixing can lead to dense cupcakes, and we want them light and airy!
- Check Your Oven Temperature: Ovens can be tricky! If you have an oven thermometer, use it to ensure accurate temperatures. Baking at too high or too low can affect the rise and texture of your cupcakes.
- Cooling Time is Key: Resist the urge to frost those cupcakes right away! Let them cool completely; otherwise, you’ll end up with a melty frosting disaster instead of a deliciously frosted treat.
- Be Creative with Decorations: Don’t be afraid to add your twist! Use different kinds of sprinkles, or even edible glitter to make your vampire bites extra festive. The more creative, the better!
- Practice Patience: If you’re new to baking, don’t fret if they don’t come out perfect the first time. Baking is all about practice, so have fun with it and learn as you go!
With these tips, you’re well on your way to creating some seriously delicious and hauntingly beautiful Halloween cupcakes. Happy baking!
Variations on Halloween Vampire Bite Cupcakes
Now, let’s talk about how to switch things up a bit with your *Halloween vampire bite cupcakes*! One of the best things about baking is that you can totally customize your treats to match your style or mood. Here are some fun ideas to get your creative juices flowing:
- Flavored Frosting: Instead of traditional chocolate frosting, try using flavored options like cream cheese, vanilla bean, or even peanut butter frosting. Each one adds a delicious twist that pairs perfectly with the chocolate base!
- Mini Chocolate Chips: Fold in some mini chocolate chips into the batter for an extra chocolaty surprise in every bite. They add a delightful texture and richness that you won’t want to miss.
- Spooky Sprinkles: Top your frosted cupcakes with Halloween-themed sprinkles! Think ghosts, pumpkins, or even edible glitter to add some sparkle to those vampire bites!
- Fruit Fillings: For a fruity twist, consider adding a dollop of raspberry or cherry jam inside the cupcake before frosting. It’ll create a delightful surprise when you bite into it—just like a juicy, spooky treat!
- Red Velvet Version: Want to go for a dramatic look? Substitute half the cocoa powder with red food coloring to make red velvet cupcakes. Then, frost them with cream cheese frosting for a deliciously unique spin!
- Nutty Crunch: Add crushed walnuts or pecans into the batter for a nutty flavor and crunchy texture. It’s a great way to elevate your cupcakes and add a bit of depth to the taste!
Feel free to mix and match these ideas to create your own perfect Halloween treat. Baking is all about having fun, so let your imagination run wild! I can’t wait to see what spooky creations you come up with!
Storage & Reheating Instructions
So, you’ve made these delicious *Halloween vampire bite cupcakes* and now you’ve got some leftovers (if they last that long!). No worries! Storing them properly is super easy. Just place your cupcakes in an airtight container to keep them fresh. They’ll stay delicious for about 3-4 days at room temperature, but if you want to extend their shelf life, you can pop them in the fridge. Just remember to let them come back to room temperature before diving in again!
If you find yourself with an abundance of cupcakes (lucky you!), you can also freeze them! Just wrap each cupcake individually in plastic wrap, then place them in a freezer-safe bag or container. They’ll keep well for up to 2 months. When you’re ready to enjoy one, simply take it out and let it thaw in the fridge overnight. No need to reheat—these treats are best enjoyed chilled or at room temperature, especially with that rich frosting on top!
With these simple storage tips, you can savor your spooky creations for days to come. Happy indulging!
Frequently Asked Questions
Got questions about these *Halloween vampire bite cupcakes*? Don’t worry, I’ve got you covered! Here are some of the most common queries I hear, along with my answers to help you out:
Can I use a different frosting?
Absolutely! While chocolate frosting is a classic choice, you can totally switch it up. Try cream cheese frosting for a tangy twist, or even a bright orange buttercream for a fun Halloween vibe! The sky’s the limit!
What if I don’t have gel food coloring?
No problem at all! If you don’t have gel food coloring, you can use liquid food coloring instead. Just be mindful that it might make your frosting a bit runny, so add it in small amounts. Alternatively, you could use strawberry or raspberry sauce to create a “bloody” effect!
How long will they last?
These cupcakes are best enjoyed fresh, but they’ll stay tasty for about 3-4 days when stored in an airtight container at room temperature. If you need to keep them longer, just pop them in the fridge or freeze them—trust me, they’ll still be delicious!
Can I make these cupcakes ahead of time?
Definitely! You can bake the cupcakes a day or two in advance. Just allow them to cool completely before storing them in an airtight container. Frost them just before serving to keep that frosting fresh and fabulous!
What if I want to make them gluten-free?
You can easily make these cupcakes gluten-free by swapping out the all-purpose flour for a gluten-free blend. There are some great mixes available that work beautifully in baking! Just follow the instructions on the package for the best results.
So, there you have it! If you have any more burning questions, feel free to reach out. I’m here to help you make these Halloween treats a total success!
Why You’ll Love This Recipe
- Quick preparation—whip up a batch in just 35 minutes!
- Fun for kids—let them help decorate and add their own spooky touches!
- Great for Halloween parties—these cupcakes are sure to be a hit with guests!
- Customizable decorations—get creative with toppings and colors to match your theme!
- Delicious chocolate flavor that everyone will love—perfect for satisfying sweet cravings!
- Perfect for sharing—bring them to school or work for a festive treat!
- Simple ingredients you probably already have in your pantry—no special trips to the store!
- Make-ahead friendly—bake in advance and frost right before serving!
- Adorable presentation with those vampire bite marks—guaranteed to make you smile!

Halloween Vampire Bite Cupcakes: 7 Spooky Delights Await
- Total Time: 35 minutes
- Yield: 12 cupcakes 1x
- Diet: Vegetarian
Description
Delicious cupcakes designed to look like they have vampire bites.
Ingredients
- 1 cup all-purpose flour
- 1 cup granulated sugar
- 1/2 cup unsweetened cocoa powder
- 1/2 cup butter, softened
- 2 large eggs
- 1/2 cup milk
- 1 teaspoon vanilla extract
- 1 teaspoon baking powder
- 1/2 teaspoon salt
- Red gel food coloring
- Chocolate frosting
Instructions
- Preheat your oven to 350°F (175°C).
- In a bowl, mix flour, sugar, cocoa powder, baking powder, and salt.
- Add butter, eggs, milk, and vanilla. Beat until smooth.
- Fill cupcake liners 2/3 full with batter.
- Bake for 18-20 minutes.
- Let cool completely.
- Frost with chocolate frosting.
- Create bite marks with a knife and add red gel food coloring for blood.
Notes
- Use mini chocolate chips for added decoration.
- Store in an airtight container.
- Can substitute butter with vegetable oil.
- Prep Time: 15 minutes
- Cook Time: 20 minutes
- Category: Dessert
- Method: Baking
- Cuisine: American
Nutrition
- Serving Size: 1 cupcake
- Calories: 210
- Sugar: 18g
- Sodium: 150mg
- Fat: 9g
- Saturated Fat: 5g
- Unsaturated Fat: 3g
- Trans Fat: 0g
- Carbohydrates: 29g
- Fiber: 1g
- Protein: 2g
- Cholesterol: 30mg
Keywords: halloween vampire bite cupcakes