
Did you know that chicken kiev actually hails from Eastern Europe, yet it has found its way into the hearts of food lovers all around the world? It’s one of those comforting dishes that just feels like a warm hug on a plate! I mean, what’s not to love about juicy chicken breasts stuffed with rich, garlicky herb butter, all crispy and golden on the outside? When you cut into it, that luscious butter oozes out, and it’s pure magic! This easy chicken kiev recipe is perfect for a cozy weeknight dinner or impressing guests at a gathering. Trust me, once you try it, you’ll be hooked on its delicious flavor and delightful crunch. Let’s dive in and make this simple yet impressive dish together!
Ingredients List
- 4 chicken breasts, pounded to even thickness for even cooking
- 100g unsalted butter, softened at room temperature for easy mixing
- 2 cloves garlic, minced for that rich, aromatic flavor
- 2 tablespoons fresh parsley, chopped to add color and freshness
- 1 teaspoon lemon juice to brighten the butter mixture
- 1 cup breadcrumbs for a delightful crunch
- 1 cup all-purpose flour for dredging
- 2 eggs, beaten to help the breadcrumbs stick
- Salt and pepper to taste for seasoning
How to Prepare Easy Chicken Kiev
Alright, let’s get down to the nitty-gritty of making this easy chicken kiev! I promise, once you get the hang of it, you’ll feel like a pro in the kitchen. First things first, we’ll start with that glorious garlic herb butter.
Prepping the Garlic Herb Butter
In a mixing bowl, combine your softened butter, minced garlic, chopped parsley, lemon juice, salt, and pepper. You want a smooth, spreadable consistency—so if your butter is too hard, just let it sit out a bit longer. It should be easy to mix! Once combined, set this beauty aside; it’s going to be the star of the show!
Preparing the Chicken Breasts
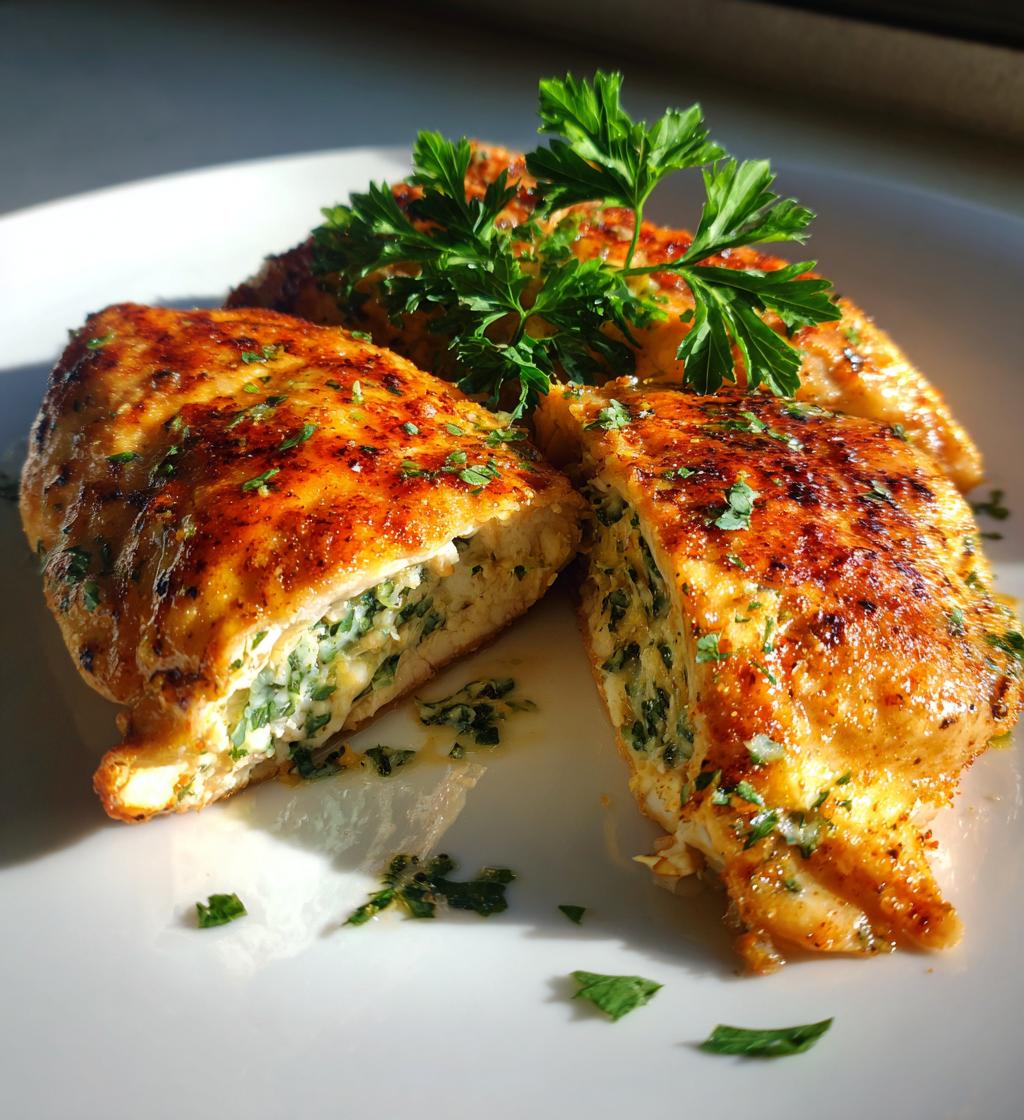
Now, take your pounded chicken breasts and make a pocket in each one. To do this, slice through the thickest part of the breast, but be careful not to cut all the way through. You want a nice little pouch to hold that buttery goodness! Next, fill each pocket with about a tablespoon of your garlic herb butter. Then, seal the pocket with toothpicks—this is super important to keep the filling from escaping while cooking!
Breading the Chicken
Time to get those chicken breasts all dressed up! Start by dredging each one in flour, shaking off the excess. Next, dip them into the beaten eggs—this helps the breadcrumbs stick. Finally, coat the chicken in breadcrumbs, pressing gently to ensure an even coating all around. This step is crucial for that crispy texture we all crave!
Baking the Chicken
Preheat your oven to 200°C (400°F) and arrange your breaded chicken on a baking tray lined with parchment paper. Bake them for about 25-30 minutes or until they turn a beautiful golden brown and are cooked through. To check for doneness, cut into one of the breasts and make sure the juices run clear. Remember, they’ll be incredibly hot, so let them rest for a few minutes before serving!
Nutritional Information
Now, let’s talk numbers! This easy chicken kiev is not just delicious, but it also packs a decent nutritional punch. Each serving, which is one chicken kiev, contains approximately 350 calories. You’ll find about 20 grams of fat in there, with 10 grams being saturated fat. It’s a great source of protein too, with around 25 grams, making it a filling option for dinner. On the carb side, there are about 20 grams, which keeps it balanced. And don’t worry, it’s only got a touch of sugar at 1 gram and a moderate sodium level of 600 mg. Just a heads up—these values are estimates, so they can vary a bit depending on your exact ingredients and cooking methods. Enjoy your meal without guilt!
Tips for Success
To make sure your easy chicken kiev turns out absolutely perfect, here are some handy tips! First, don’t be shy with the garlic—if you love that bold flavor, feel free to add an extra clove or two! Just remember, the more garlic you use, the stronger the taste will be. When sealing the chicken pockets, make sure to securely fasten them with toothpicks; if they’re not sealed well, your delicious filling might leak out while baking. Also, consider letting your breaded chicken rest for about 10 minutes before baking; this helps the coating stick better and enhances that crispy texture. If you have leftovers (which I highly doubt because they’re so good!), store them in an airtight container in the fridge for up to 3 days. You can even freeze uncooked chicken kiev for a quick meal later—just make sure to thaw it in the fridge overnight before cooking!
FAQ Section
Got questions about making easy chicken kiev? I’ve got answers! Here are some common ones that might pop up as you’re cooking.
Can I fry chicken kiev instead of baking it?
Absolutely! If you prefer a golden, crispy exterior, you can pan-fry the chicken in a bit of oil over medium heat for about 6-7 minutes per side until cooked through. Just be careful not to overcrowd the pan!
What can I use instead of breadcrumbs?
If you’re looking for a gluten-free option, crushed rice cereal or almond flour works beautifully as a substitute for breadcrumbs. They’ll give you that satisfying crunch without the gluten!
Can I make this recipe ahead of time?
Yes! You can prepare the chicken kiev and freeze it before baking. Just ensure it’s well-wrapped, and when you’re ready to cook, bake from frozen, adding a few extra minutes to the cooking time.
What’s the best way to serve chicken kiev?
Serve your easy chicken kiev with a fresh side salad, or mashed potatoes for a comforting meal. You could also pair it with steamed veggies for a lighter option!
These tips should help you feel confident in the kitchen as you whip up this delightful dish! Enjoy every flavorful bite!
Why You’ll Love This Recipe
- Quick to prepare—ready in just 45 minutes!
- Flavor-packed with garlic herb butter that oozes out with every bite
- Crispy, golden coating that adds the perfect crunch
- A comforting dish that’s sure to impress family and friends
- Great for meal prep or an easy weeknight dinner
- Versatile—pair it with salads, mashed potatoes, or steamed veggies
Storage & Reheating Instructions
Storing your easy chicken kiev properly is key to keeping that delicious flavor and texture intact! If you have leftovers (which is a rare treat!), let them cool completely before placing them in an airtight container. They can be stored in the fridge for up to 3 days. Just make sure to keep them well sealed to avoid any fridge odors mingling in.
When you’re ready to enjoy them again, I recommend reheating in the oven for the best results. Preheat your oven to 180°C (350°F), place the chicken kiev on a baking tray, and heat for about 15-20 minutes until warmed through and the coating is crispy again. You can also use an air fryer if you have one—it’s a fantastic way to re-crisp the exterior! Just a few minutes at 160°C (320°F) should do the trick. Enjoy every bite of that garlicky goodness again!
Print
Easy Chicken Kiev: 5 Reasons You’ll Crave This Comfort Dish
- Total Time: 45 minutes
- Yield: 4 servings 1x
- Diet: Low Fat
Description
Easy chicken kiev is a flavorful dish featuring chicken breasts filled with garlic herb butter, coated in breadcrumbs, and baked or fried.
Ingredients
- 4 chicken breasts
- 100g unsalted butter, softened
- 2 cloves garlic, minced
- 2 tablespoons fresh parsley, chopped
- 1 teaspoon lemon juice
- 1 cup breadcrumbs
- 1 cup all-purpose flour
- 2 eggs, beaten
- Salt and pepper to taste
Instructions
- Preheat your oven to 200°C (400°F).
- In a bowl, mix the softened butter, garlic, parsley, lemon juice, salt, and pepper.
- Slice a pocket into each chicken breast and fill with the garlic herb butter.
- Seal the pocket with toothpicks.
- Dredge each chicken breast in flour, dip in beaten eggs, and coat with breadcrumbs.
- Place the chicken on a baking tray and bake for 25-30 minutes until golden and cooked through.
- Remove toothpicks before serving.
Notes
- Serve with a side salad or mashed potatoes.
- You can freeze the uncooked chicken kiev for later use.
- Adjust garlic quantity based on preference.
- Prep Time: 15 minutes
- Cook Time: 30 minutes
- Category: Main Course
- Method: Baking
- Cuisine: European
Nutrition
- Serving Size: 1 chicken kiev
- Calories: 350
- Sugar: 1g
- Sodium: 600mg
- Fat: 20g
- Saturated Fat: 10g
- Unsaturated Fat: 5g
- Trans Fat: 0g
- Carbohydrates: 20g
- Fiber: 2g
- Protein: 25g
- Cholesterol: 70mg
Keywords: easy chicken kiev, chicken recipe, garlic butter chicken