
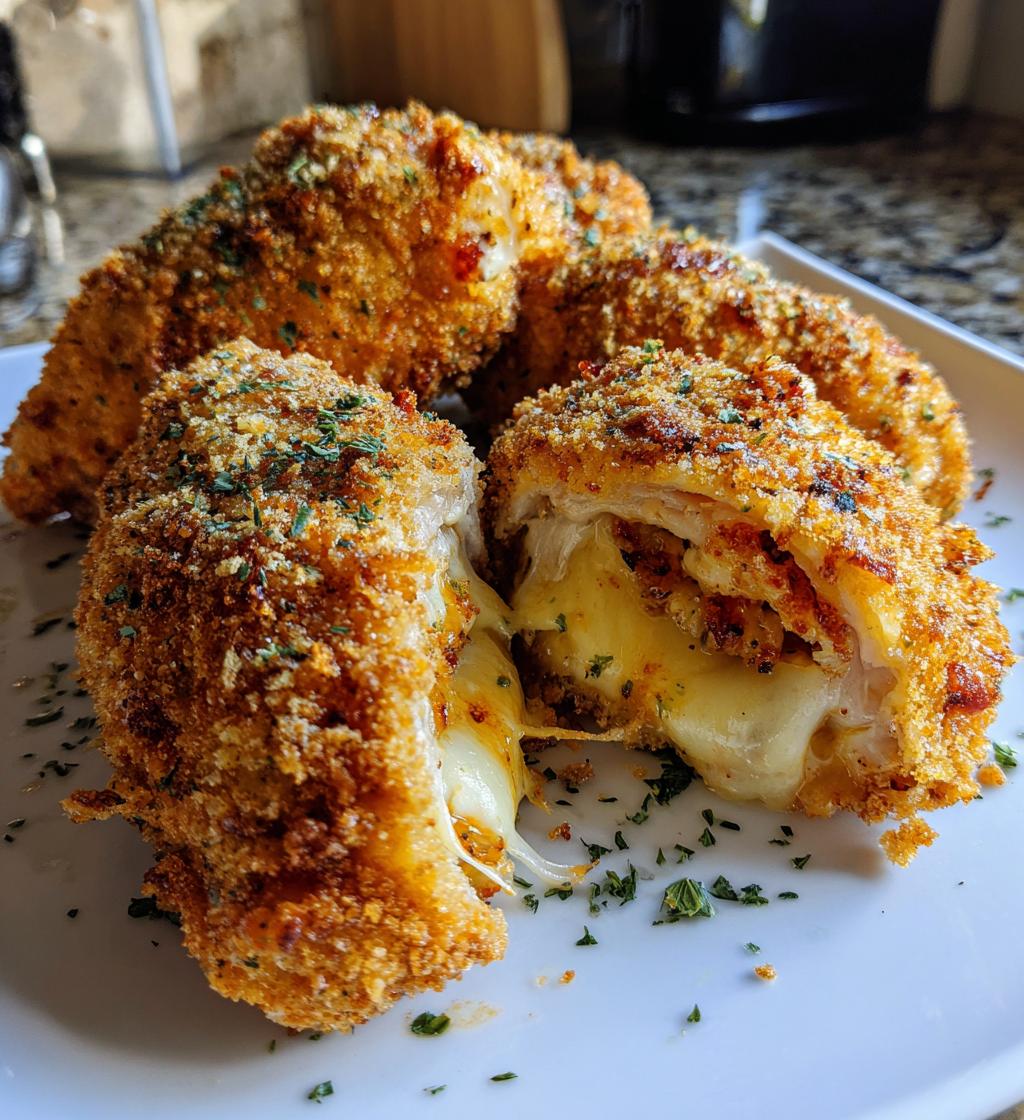
Oh my goodness, let me tell you about chicken kiev frozen! These little delights are like a hug in food form, with tender chicken breasts stuffed with rich, garlicky butter that melts into a luscious center. And that crispy coating? It’s pure magic! The best part is, this dish is a total lifesaver for busy weeknights. With just a bit of prep, you can have a comforting, restaurant-quality meal on the table in no time. Trust me, you’ll love how easy it is to whip these up, pop them in the oven, and let the delicious aroma fill your kitchen while you unwind.
Ingredients List
- 4 large chicken breasts
- 100g garlic butter
- 200g breadcrumbs
- 1 cup all-purpose flour
- 2 eggs
- Salt to taste
- Pepper to taste
How to Prepare Chicken Kiev Frozen
Okay, let’s dive into making these delightful chicken kievs! It’s super simple, and I promise, you’ll feel like a kitchen wizard by the end of it. First things first, you need to preheat your oven to 200°C (400°F). This is crucial because we want that perfect crispy finish!
Prepping the Chicken
Now, grab your chicken breasts and place them between two sheets of plastic wrap. Using a meat mallet (or a heavy pan—whatever works!), gently pound them until they’re about half an inch thick. This not only helps them cook evenly but also makes them tender. Just remember, we’re going for a nice flat surface here!
Adding the Garlic Butter
Next up, take that delicious garlic butter and place a generous dollop right in the center of each flattened chicken breast. Then, fold the chicken over the butter like a cozy little pocket, and secure the edges with toothpicks. This step is key because we don’t want any of that buttery goodness escaping while it cooks!
Coating the Chicken
Now comes the fun part—coating! Start by dredging each chicken pocket in flour, making sure to shake off any excess. Next, dip it in the beaten eggs, letting the extra drip back into the bowl. Finally, coat it in breadcrumbs, pressing gently to ensure they stick. This will give you that irresistible crunch!
Baking Instructions
Place your beautifully coated chicken kievs in a baking dish, and pop them into the preheated oven. Bake for about 25-30 minutes or until they’re golden brown and cooked through. To check for doneness, make sure the juices run clear when pierced. Ooh, you’re in for a treat!
Why You’ll Love This Recipe
- Quick preparation: You can whip these up in no time! With just a little bit of prep, you can have a fabulous meal ready to go, making it perfect for those busy weeknights.
- Delicious garlic butter flavor: Seriously, that rich, garlicky goodness bursting from the center is like a flavor explosion with every bite. It’s comfort food at its finest!
- Versatile serving options: Whether you pair it with a fresh salad, some roasted veggies, or creamy mashed potatoes, chicken kiev fits right in. You can even serve it with a side of dipping sauce for an extra touch!
- Ideal for meal prep: Make a batch ahead of time and freeze them! Having homemade chicken kiev ready to pop in the oven is a game-changer for meal planning.
Tips for Success
Alright, let’s make sure your chicken kiev turns out absolutely perfect! Here are my top tips to help you achieve that crispy coating and juicy filling every time.
- Don’t skip the pounding: Flattening the chicken breasts is essential. It helps them cook evenly and ensures that they’re tender. Plus, it makes wrapping the butter easier!
- Chill the butter: If you find your garlic butter a bit too soft, pop it in the freezer for a few minutes before using it. This way, it’ll hold its shape inside the chicken better and won’t leak out during cooking.
- Season generously: Don’t be shy with the salt and pepper! Seasoning the chicken before coating it will enhance the flavors and make each bite more delicious.
- Use a wire rack: If you have one, place your coated chicken on a wire rack in the baking dish. This allows air to circulate around the chicken, helping the coating crisp up beautifully on all sides.
- Check your oven temperature: Every oven is a bit different! Consider using an oven thermometer to make sure it’s at the right temp. If it’s too hot, you might end up with burnt breadcrumbs before the chicken is fully cooked.
- Let it rest: Once your chicken kiev is out of the oven, let it rest for a few minutes before serving. This allows the juices to redistribute and keeps it nice and moist!
With these tips, you’re well on your way to mastering chicken kiev frozen! Enjoy the process and happy cooking!
Nutritional Information
Now, let’s talk about the nutritional side of our delicious chicken kiev frozen! Here’s the estimated breakdown per serving, which is one piece of that crispy, buttery goodness:
- Calories: 350
- Fat: 20g
- Saturated Fat: 10g
- Unsaturated Fat: 8g
- Trans Fat: 0g
- Cholesterol: 80mg
- Sodium: 600mg
- Carbohydrates: 20g
- Fiber: 2g
- Sugar: 1g
- Protein: 25g
Keep in mind, these figures are estimates and can vary based on specific brands and preparation methods. But don’t worry, they still pack a nutritious punch while delivering that satisfying, comfort food experience we all crave!
FAQ Section
I’ve gathered some common questions about chicken kiev frozen that might pop into your mind while cooking. Let’s dive into these FAQs, shall we?
Can I freeze chicken kiev after baking?
Absolutely! Once baked, let your chicken kiev cool completely, then wrap them tightly in plastic wrap and store them in an airtight container or freezer bag. They can be frozen for up to 2 months. Just reheat in the oven until heated through, and you’ll have that crispy goodness again!
What can I serve with chicken kiev?
Oh, the options are endless! I love pairing it with a fresh garden salad, some roasted vegetables, or creamy mashed potatoes. You could even whip up a tangy dipping sauce, like a garlic aioli or a zesty lemon butter, to complement those rich flavors. Whatever you choose, it’s bound to be delicious!
How do I know when chicken is cooked through?
Great question! The best way to check is to insert a meat thermometer into the thickest part of the chicken. It should read 75°C (165°F) when it’s safely cooked. If you don’t have a thermometer, you can cut into the chicken and make sure the juices run clear and there’s no pink meat left. Safety first, my friend!
Feel free to reach out if you have any more questions or need tips while making your chicken kiev frozen! Happy cooking!
Storage & Reheating Instructions
Alright, let’s talk about how to keep those delicious chicken kiev frozen goodies fresh and ready for your next meal! If you have any leftovers (which is rare, trust me), let them cool completely after baking. Then, wrap each piece tightly in plastic wrap and store them in an airtight container or a freezer bag. This way, you can stash them in the fridge for up to 3 days or pop them in the freezer for up to 2 months. Just make sure to label them with the date so you know what you’ve got!
When you’re ready to enjoy your chicken kiev again, you’ll want to reheat it without losing that delightful crispiness. The best method is to use your oven. Preheat it to 180°C (350°F) and place your chicken kiev on a baking sheet. Bake for about 15-20 minutes, or until they’re heated through and the coating is nice and crunchy again. If you’re in a hurry, you can microwave them, but be careful! Microwaving can make the coating soggy, so I recommend only doing this if it’s your only option. Just pop it in for about 1 minute, then check if it’s warm enough. If not, give it another quick burst. But trust me, the oven is the way to go for that crispy finish!
With these storage and reheating tips, you’ll be able to enjoy your chicken kiev frozen just as deliciously as the first time around!
Print
Chicken Kiev Frozen: 5 Comforting Secrets Revealed
- Total Time: 45 minutes
- Yield: 4 servings 1x
- Diet: Gluten Free
Description
Frozen chicken kiev made with tender chicken breasts, garlic butter, and a crispy coating.
Ingredients
- 4 chicken breasts
- 100g garlic butter
- 200g breadcrumbs
- 1 cup all-purpose flour
- 2 eggs
- Salt to taste
- Pepper to taste
Instructions
- Preheat oven to 200°C (400°F).
- Flatten chicken breasts using a meat mallet.
- Place garlic butter in the center of each chicken breast.
- Fold the chicken over the butter and secure with toothpicks.
- Season with salt and pepper.
- Dredge each chicken piece in flour.
- Dip in beaten eggs.
- Coat with breadcrumbs.
- Place in a baking dish.
- Bake for 25-30 minutes until golden brown.
Notes
- Can be prepared in advance and frozen.
- Serve with a side of vegetables.
- Ensure chicken is cooked through before serving.
- Prep Time: 15 minutes
- Cook Time: 30 minutes
- Category: Main Course
- Method: Baking
- Cuisine: European
Nutrition
- Serving Size: 1 piece
- Calories: 350
- Sugar: 1g
- Sodium: 600mg
- Fat: 20g
- Saturated Fat: 10g
- Unsaturated Fat: 8g
- Trans Fat: 0g
- Carbohydrates: 20g
- Fiber: 2g
- Protein: 25g
- Cholesterol: 80mg
Keywords: chicken kiev frozen