
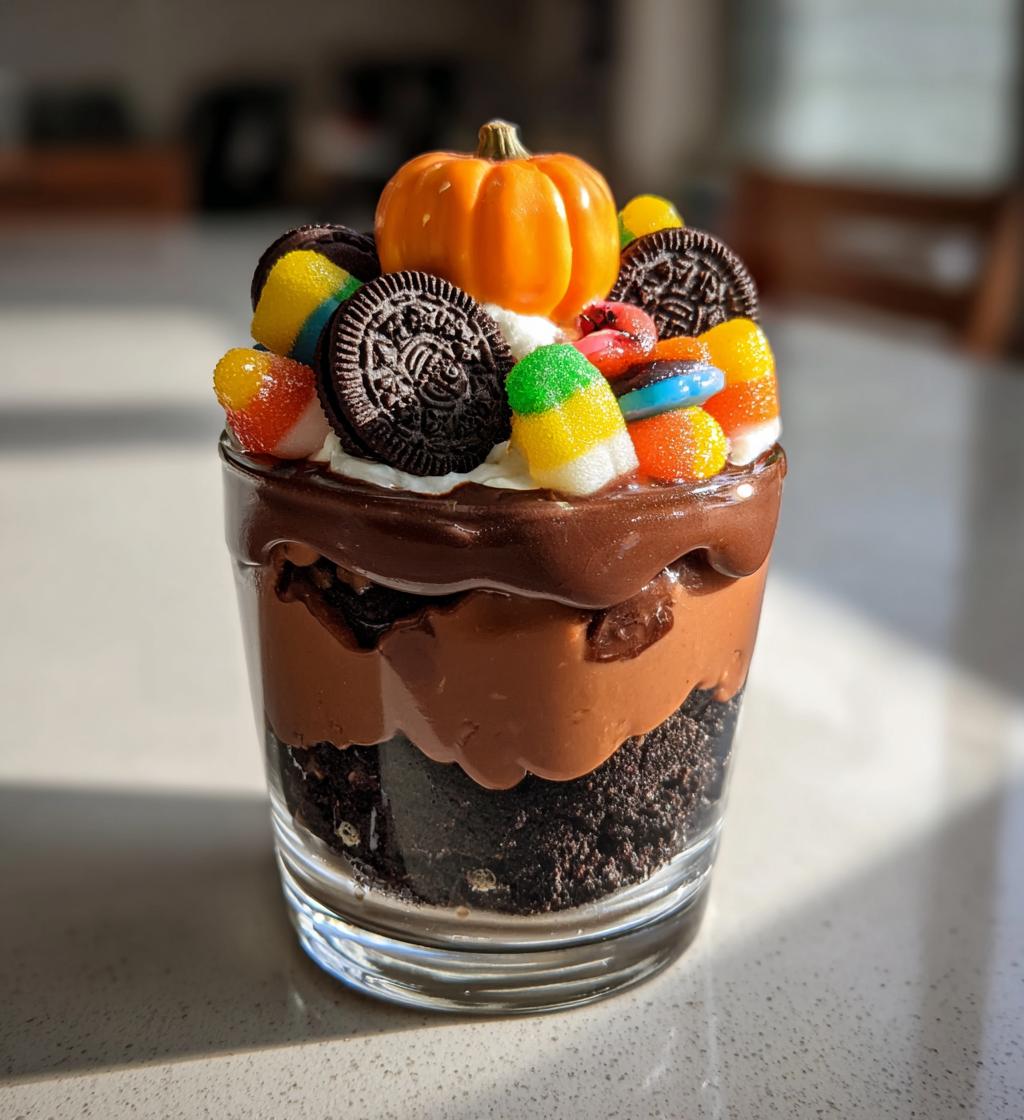
Oh my goodness, have you ever made *pumpkin patch dirt cups*? They’re such a fun and creative treat that’s perfect for Halloween or any fall gathering! Imagine a deliciously rich chocolate pudding layered with crushed Oreo cookies, topped off with colorful gummy worms—talk about a crowd-pleaser! I love how these cups not only taste incredible but also bring a bit of whimsy to the table. Plus, they’re super easy to whip up, making them a go-to dessert when I need something quick yet impressive. Trust me, once you present these adorable little cups with a cute pumpkin on top, everyone will be asking for seconds. Get ready to dive into a dessert that’s as fun to make as it is to eat!
Ingredients for Pumpkin Patch Dirt Cups
- 1 package of chocolate pudding mix
- 2 cups of milk
- 1 package of Oreo cookies, crushed
- 1 cup of whipped cream, folded in
- 1 cup of gummy worms
- 1 small pumpkin for decoration
How to Prepare Pumpkin Patch Dirt Cups
- First, grab a mixing bowl and whisk together the chocolate pudding mix and milk. You want to mix until it’s super smooth; this should only take a minute or two. Honestly, the smell of chocolate is just heavenly!
- Next, gently fold in the whipped cream. This step is crucial for that light, airy texture you want in your dirt cups. Make sure everything is combined well but be careful not to deflate that fluffiness!
- Now it’s time to layer! Grab your favorite cups and start with a layer of crushed Oreo cookies at the bottom. Don’t skimp on the cookies; they’re the dirt for your pumpkin patch!
- On top of the Oreos, add a generous layer of your chocolate pudding mixture. Spread it out evenly so every bite is delicious.
- Repeat the layers with another round of crushed Oreos followed by more pudding. You’ll want to end with that rich chocolate layer on top.
- Finally, for the fun part, decorate with gummy worms! Arrange them so it looks like they’re crawling through the “dirt.”
- Place a small pumpkin on top for that festive touch! Chill the cups in the fridge for at least 30 minutes before serving. This helps everything set perfectly and makes it even more refreshing!
Why You’ll Love This Recipe
- Quick to prepare—whip these up in just 15 minutes!
- No baking required, making it a stress-free dessert option.
- Visually appealing with layers of chocolate and crushed Oreos.
- Fun for all ages, kids and adults alike will adore them!
- Perfect for Halloween parties or cozy fall gatherings.
Tips for Success with Pumpkin Patch Dirt Cups
To ensure your pumpkin patch dirt cups come out absolutely perfect, here are my go-to tips. First, make sure to chill the pudding mixture before layering—it helps to set things up and makes the layers easier to handle. When folding in the whipped cream, go gently; you want to maintain that airy texture that makes each bite feel light and delightful. For the crushed Oreos, I like to use a food processor for a fine crumb, but if you don’t have one, just place them in a zip-top bag and crush away with a rolling pin! This way, they’ll create a nice “dirt” layer without any big chunks. Lastly, don’t forget to add that cute little pumpkin on top—it really makes the dessert pop and adds a charming fall touch. Enjoy the process, and have fun decorating!
Variations of Pumpkin Patch Dirt Cups
- Flavor Twist: Swap the chocolate pudding for vanilla or butterscotch for a different flavor profile.
- Candy Switch: Use different gummy candies like gummy snakes or spiders to mix up the theme.
- Nutty Crunch: Add crushed nuts or granola between layers for a delightful crunch.
- Seasonal Fruits: Top with mini candy corn or seasonal fruits like sliced strawberries for a fresh touch.
- Chocolate Lovers: Mix in some chocolate chips or drizzle chocolate syrup on top for extra indulgence!
Storage & Reheating Instructions
To store your leftover pumpkin patch dirt cups, simply cover them tightly with plastic wrap or transfer them to an airtight container. They’ll keep well in the fridge for up to 3 days, but trust me, they’re so delicious, you might not have any left to store! There’s no need to reheat these cups—just serve them chilled right from the fridge. The layers will stay nice and fresh, and the chocolate pudding will still be perfectly creamy. Enjoy every last bite!
Nutritional Information for Pumpkin Patch Dirt Cups
So, let’s talk about the nutritional side of these delightful pumpkin patch dirt cups! Keep in mind that nutritional values can vary based on the specific ingredients and brands you use. But typically, each serving (that’s about 1 cup) packs in approximately:
- Calories: 250
- Fat: 10g
- Saturated Fat: 5g
- Unsaturated Fat: 3g
- Trans Fat: 0g
- Cholesterol: 15mg
- Sodium: 150mg
- Carbohydrates: 35g
- Fiber: 2g
- Sugar: 20g
- Protein: 4g
These cups are a delightful treat, and while they’re not exactly a health food, they’re certainly a fun indulgence! Enjoy them in moderation, and don’t forget to share the joy with friends and family!
FAQ about Pumpkin Patch Dirt Cups
Can I make these ahead of time?
Absolutely! You can prepare your pumpkin patch dirt cups a day in advance. Just keep them covered in the fridge until you’re ready to serve. This allows the flavors to meld together beautifully!
What can I use instead of gummy worms?
If gummy worms aren’t your thing, feel free to swap them out for any candy you like! Gummy spiders or even chocolate-covered pretzels can add a fun twist to your dessert.
How long do these cups stay fresh?
Your pumpkin patch dirt cups will stay fresh in the fridge for about 3 days. Just make sure they’re sealed properly to keep that creamy texture intact!
Can I use a different type of cookie?
Definitely! While Oreos are traditional, you can use any chocolate cookie you love. Think about trying chocolate graham crackers for a unique flavor!
Is this recipe suitable for kids?
Yes, these pumpkin patch dirt cups are perfect for kids! They can help with the layering and decorating, making it a fun activity for the whole family!

Pumpkin Patch Dirt Cups: 7 Reasons You’ll Adore This Treat
- Total Time: 45 minutes
- Yield: 4 servings 1x
- Diet: Vegetarian
Description
A fun and creative dessert inspired by pumpkin patches, perfect for Halloween or fall gatherings.
Ingredients
- 1 package of chocolate pudding mix
- 2 cups of milk
- 1 package of Oreo cookies, crushed
- 1 cup of whipped cream
- 1 cup of gummy worms
- 1 small pumpkin for decoration
Instructions
- In a bowl, mix the chocolate pudding mix and milk until smooth.
- Fold in the whipped cream until fully combined.
- In cups, layer the crushed Oreo cookies at the bottom.
- Add a layer of chocolate pudding mixture on top of the Oreos.
- Add another layer of crushed Oreos.
- Top with gummy worms for decoration.
- Place a small pumpkin on top for a festive touch.
Notes
- Chill for at least 30 minutes before serving.
- Use different candies for variety.
- Prep Time: 15 minutes
- Cook Time: 0 minutes
- Category: Dessert
- Method: No-Bake
- Cuisine: American
Nutrition
- Serving Size: 1 cup
- Calories: 250
- Sugar: 20g
- Sodium: 150mg
- Fat: 10g
- Saturated Fat: 5g
- Unsaturated Fat: 3g
- Trans Fat: 0g
- Carbohydrates: 35g
- Fiber: 2g
- Protein: 4g
- Cholesterol: 15mg
Keywords: pumpkin patch dirt cups, Halloween dessert, fall dessert, no-bake dessert